Showing posts with label guest designer. Show all posts

Authentique's Enchanted Boo Holiday Decor by Guest Designer SaLee Phillips

This was a fun, quick and pretty simple project to make. These letters can be hung on the wall, adhered to piece of wood, or on a deco mesh wreath! Lots of options with these MDF letters.


1. Paint the letters black with the acrylic paint

2. Coat each letter with Mod Podge and cover with a sheet of decorative paper
 
3. Using an exacto knife, cut out the letter (you can trace the letter on the paper and cut with scissors if you prefer, but I like to to use a craft knife for a more precision cut).
 
4.  Using Tim Holtz distressed ink in Black Soot and the applicator tool, distress the edges of the letters with the ink to give it more depth. Please add these two items to the supply list).
 
5. Once the paper is adhered to the letter, coat with Mod Podge and sprinkle with Martha Stewart Glow in the Dark Glitter (add this item to the supply list)
 
6.  Letter "B":  stick on the Jolee's haunted tree, crows and moon; hot glue the feathers to the top left corner; put sticker on metal cameo (this was something I had left over) but when I did a workshop, I cut out a cameo shape from a Cricut cartridge and used Stampendous Glitter Glass on it---it turned out even better than the metal one I used; add the October 31st sticker to the tree.
 
7.  Letter "O":  wrap some spider webbing around the letter; hot glue the stickers on; stamp was the My Minds Eye new Halloween stamp which I stamped with black and put Glossy Accent Crackle on (another sticker from the collection can also be used in place of the stamp); I also put the crackle on the big sticker; stick on a few spiders from Jolees and black flowers from Petaloo (add to list of products)
 
8.  Letter "O":  Glossy Accent the stickers; used the Alcohol Ink patina  (black and ocher) to the metal skulls then hung them on the O with a small chain; spray some black Mister Hueys on the gauze and place under the sticker---another GREAT option is using black tulle or use both for more fun!


Guest Designer SaLee Phillips


Welcome today's guest designer, SaLee Phillips, an amazing crafter and also a Craft Warehouse scrapbooking department manager! We are blessed to have SaLee as a part of our Craft Warehouse Team!

How long have you been crafting?

I have been crafting since about 1992. That was the year I got married and moved from Kennewick, WA to Tallahassee, Florida. There I was finishing up school, looking for work and things to keep me busy.

My sister-in-law from Seattle loved to cross stitch and got me started just before I moved, so that was my first real crafting project, a counted cross stitch of a Christmas scene with Santa in front of the fireplace checking his list. As a matter of fact, I think that is what the the kit was called, "Checking His List".  I still have this counted cross stitch and bring it out every Christmas.

From there, I did tole painting, scrapbooking and stamping. Today, I do more papercrafting than anything else. I just love all the amazingly beautiful papers that Craft Warehouse offers.


What inspires you to be creative?

I get inspired from lots of things, but if I had to pick just one, I would say nature. I love the colors of each season and tend to create based on the season and the beautiful colors of each season.


What Craft Warehouse products do you love to use?

PAPER because they have the BEST selection.

How can you encourage others reading this column?

There is no right or wrong way to craft...it is all about being creative and enjoying the time you put into a project.

Halloween Party by Guest Designer Michelle Price


I'm excited to share this fun Halloween idea with you. I'm known in my family as the Halloween Queen, a title I wear proudly, so this project is right up my alley. I received the adorable Haunted Manor line from Doodlebug Design and knew immediatley it would make the perfect pieces for a Little Witch Party. I designed a Good Little Witch Party, for good little girls who don't like to be scared.


The cupcake toppers and Halloween banner came together quickly using some mini doodle-pops, banner stickers and twine.

No party would be complete without a goodie bag to take home. These cute bags can be put together as simply or as detailed as you choose.


Supplies:

4 1/2 x 12 sheet patterned paper
sticker sheet of sentiments and images
Plastic or Glassine bag-twine-button
 

Instructions:
1.      Use a corner rounder to round all four edges of your piece. Score your piece at 5 ½”, 6”, and 6 ½”.


2.      Fold your piece with the outsides together at the 6” score line. Now fold the flaps back together at the 5 ½” and 6 ½” score lines so the insides are together. This creates an accordion fold that will make your bag stand up on it’s own.
3.    Fold over the top of the plastic/glassine bag and sandwich it between the two flaps of your cardstock holder. The folded top edge of the glassine bag will be flush against the top of the cardstock. Place your embellishment paper on the front of the cardstock holder.
4.      Pinching all three layers together tightly, punch two small holes in the top center of the treat bag holder. Your punched holes will go through all three layers. Thread a piece of twine through the holes and wrap it through the hole twice. Finish with a secure knot. Thread your two twine tails through a button and finish by tying a bow over the top of the button. The  bag is now securely attached to the cardstock holder.
5.      Finish off by adding stickers and diecuts to the front of the treat holder.
6.      Bonus Tip: When you wrap a package, you run your ribbon along the edge of your scissor blade to make it curl. You can do the same thing with your twine tails to give them a slightly curled look. Follow the same procedure, but just do it very lightly so you do not break the twine.
 
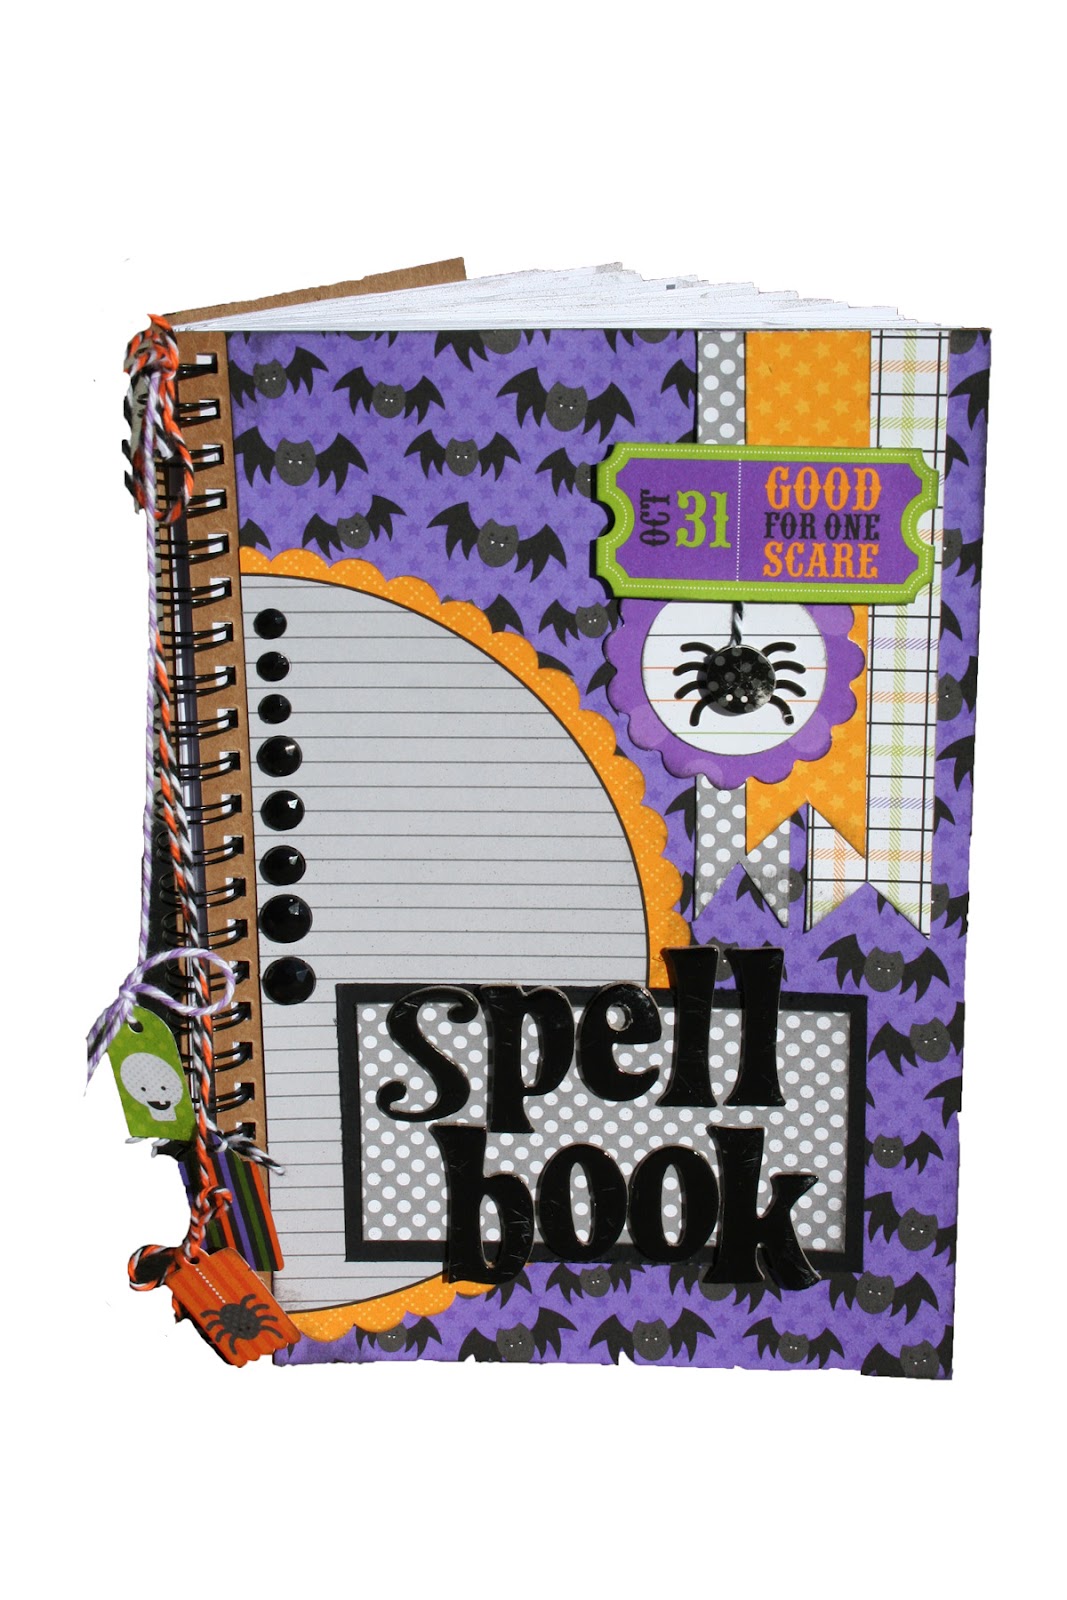
And of course no little witch can be without a cute spell book. These little books were a huge hit among the little witches. I have requests for several more.
Supplies:
5 3/4 x 81/4 kraft notebook from Craft Warehouse (only $1)
3-12 x 12 patterned papers
Mr Huey Mist
stickers-twine
 
Instructions:
1. Cut two pieces of patterned paper 5 1/2 x 8 1/4. Adhere one to the front and one to the back. These are a bit smaller than the cover piece. You will want to leave the spiral exposed so it will easily open.
 
2. Embellish the front with stickers, diecuts and scraps of pattened paper.
 
3. Open the notebook and crumple each piece of the inside paper. I just lightly crumpled the edges.
 
 
4. Once you've got all the pages crumpled, hold the book sideways with the pages towards you like a sandwich. Spray Mr. Huey mist along the edges lightly to give the book a distressed look.
 
 
5. Attach punched tags to twine and tie them to the top of the spiral spine with twine.
 
6. Have fun filling your book with toad transformation and mermaid tail spells.
Use these ideas to throw your own Halloween party and impress the little witches in your life. Thanks for having me!


Guest Designer Michelle Price


Welcome this week's guest designer and Craft Warehouse Scrapbook Design Team Alumni, Michelle Price! We love Michelle's fresh and simple style including her amazing tutorials!


How long have you been crafting?

I've been papercrafting for close to 13 years.I was introduced to card making by my future sis-in law when I was 20 and thought 'Boy-what an old lady thing to do" I rolled my eyes and tried it and have been obsessed ever since. I started with rubber stamping and quickly moved on to scrapbooking and buying gorgeous patterned papers.


What inspires you to be creative?

I could say my children inspire me, but really it's the gorgeous scrap supplies that I keep buying. I also love the creative aspect of scrapbooking. Seriously though- I love to document the little things about our lives that will so soon be forgotten. It makes me happy when my kids look through my albums and read and laugh about things they've done in the past.


What Craft Warehouse products do you love to use?

Um-everything! I love that Craft Warehouse always carries the latest and greatest trendy items in the scrapbook world. The aisles and aisles of wood items waiting to be altered make me happy too!


How can you encourage others reading this column?

There really is no right or wrong way to be creative. Find something you love and use it to make something that you will cherish. Saving your favorite scrapbook paper until you find just the right project makes no sense-use it up and you will enjoy it much more!

Make sure you join us tomorrow for Michelle's Little Witch Halloween Party tutorial!

Fall Serenade Mini Album by Guest Designer Amanda Sherman


Hi, my name is Amanda.  I’m so honored to be a guest designer for Craft Warehouse today. 
When I woke up this morning, there was a wonderful crispness in the air.  The delightful crispness that come only in the Fall.  I’m always delighted when Summer gives way to Fall.  I’m pretty sure that I’m allergic to Summer, so the cool temperatures of Fall are thrilling to me and make me so happy each and every year.  I celebrate because it means I survived another summer!  It’s always been in the back of my mind to do a mini-album of the reasons I’m so thankful for the arrival of Fall.  Fall (besides marking the end of Summer) is my favorite season.  And why not document that, right?

A few weeks ago, I received a package of Bo Bunny’s new Fall line, Serenade.  The colors are deliciously Fall, just like all the things I’m thankful for.  I decided that now would be the perfect time to make this album that I’ve had kicking around in my head.  I set to work snapping some photos with my iPhone and used Instagram to apply filters to them all so they would be consistent.  I love the contrast of the ratios of a square on a rectangular page.  This was a perfect fit for the project.


In creating this album, I not only wanted to create a beautiful project, but I want to take the opportunity to share a few techniques that make these beautiful goodies more usable.

As I began on this project, the crocheted trim (by American Crafts) was white.  The color was too harsh for the very neutral toned palette.  To make it more cohesive, I used a technique I’ve grown to love.  I’m still a little shocked that I’d been scrapbooking for 7 years before I tried using Tim Holtz inks and an applicator to ink the edges.  I was always afraid because it would be too time consuming, but it’s not. 


The white is too sharp a contrast against the neutral colors.


Use Tim Holtz Ink (or other ink) and foam applicator.


Blot applicator onto pad several times.


Gently rub onto trim.


As you can see from the before (top) and after (bottom) the inked trim is much more cohesive in tone with the paper.  It creates an appealing look rather than a distracting look caused by a too harsh color combination.

In this album I used a lot of brads.  Really, how could you not?  These Bo Bunny brads are pretty darn pretty!


However, in the application of a mini-album, it’s not very practical to use a brad.  But with the use of a side cutting wire trimmer (available in the jewelry dept if you don’t already have a pair), they can be used as a flat embellishment.  I’ve been using this technique a lot lately as I have a large brad stash but I’m never a big fan of poking holes in my papers for brads, so this approach is the perfect solution!!


Open prongs of brad.


Using wire trimmers, clip prong flush with back of brad.


Apply two glue dots (or a 3-D glue dot or foam square) to provide enough adhesive height to adhere to project.

Apply to project!

With this technique, brads can be so much more versatile and can be used in places where you can’t always put a hole to use a brad the traditional way.

In this album, I did a lot of journaling.  However, I journaled on the same blocks that I put the titles on.  It felt amiss to just write above the title even though that was the purpose.  By using a ruler to simply draw a few lines with a lighter pen (when I replace my tired pens, I keep one around still to use for when I want faint lines drawn).  Then I journaled on those lines.  The lines anchored the journaling and made it all feel cohesive.


Just as the anchor of a ship keeps the ship in place and gives it security at sea, anchoring your journaling gives it a defined place and makes it feel like it belongs securely on your page.

Also notice on the page that I used the larger letters for the key words of the title, and then the smaller ledger style letters for the supporting words.  The two work together to say clearly what is the most important part of the title.  Not only does it create strength, it creates interest in the complimentary combination.  This simple technique adds a beautiful and communicative touch.

So, I challenge you to use these elements and create your own mini album documenting what you are thankful for!

Supplies:  Bo Bunny Serenade (paper, noteworthy Collection, stickers, alpha, mini album, brads), Cosmo Cricket letters, Simple Stories Take a Hike alphabet stickers, American Crafts ribbon, Tim Holtz ink

Guest Designer Amanda Sherman


Welcome Guest Designer and Craft Warehouse Scrapbook Design Team Alumni, Amanda Sherman! Amanda has always had a knack of explaining her crafting process well, that we have had her share her tutorials on our blog often! We are thankful to have her as this week's Spotlight!


How long have you been crafting?

As long as I can remember, I have always tinkered in some craft or another.  I dreamed of the day I could start scrapbooking, but I was never willing to make the investment in tools because I didn’t know if it would stick, just as none of the other hobbies had.  Well, after my son was born, I decided it was time to make the plunge.  I had to do something with all the photos I had been taking, and since I’d wanted to scrapbook for a long time I did it.  Finally, one March, when I had a 5 month old baby, and had finished preparing our taxes for the year, I treated myself.  No one knew just how much scrapbooking would “stick”, but I had finally found a craft that I was good at, that challenged me in a fulfilling way, and best yet, allowed me to combine my hobby of photography with pretty elements and memory keeping.  It’s the best hobby ever!


What inspires you to be creative?

My biggest inspiration comes from my family.  I often use scrapbooking as a way to communicate with words how much I love my family.  So usually, a good story to tell is the most inspiring thing for me.  And a pretty close second is new goodies!  Nothing beats playing with a bag of new eye candy.


What Craft Warehouse products do you love to use?

Oh, Craft Warehouse is my favorite store ever.  If I could set up a cot and just sleep in the paper aisle, I’d be pretty content to go to sleep smelling all the good papers!  It seems the go to products I always use from Craft Warehouse are the tiny type letters from Cosmo Cricket.  With all the inspiring products being released continually, rarely do I buy repeat items.  However, those letters, I have bought at least three packs of each color.  I love them!!  American Crafts Thickers are another none of my favorite items, as well as my newest love, Tim Holtz ink.


How can you encourage others reading this column?

When I was a kid I always wanted to be a teacher.  I started down that path in college (before I dropped out), but I now play teacher every day as we homeschool our kids.  The teacher part of me has never left.  I like to include information about how and why things work besides just showing pretty pictures.  I also try to be either funny or tell a good story.  Sometimes I hit it out of the park.  Sometimes I fall on my face.  But you’ll have to read to figure out which one I will do today!

Make sure to visit our blog tomorrow with Amanda's outstanding fall mini book that you will not want to miss!


Christmas Burlap Garland by Guest Designer Rebecca Grinder


I *heart* burlap and Craft Warehouse has loads of fun new burlap perfect for the upcoming holiday season!  A new addition to stores is a burlap pocket garland. 


Craft Warehouse gave me the challenge to create a Christmas banner using this new garland and the already popular winter release by Authentique called "Peaceful".


Shopping List

  • 1 - Burlap Garland, 24 pockets
  • 1   Authentique "Peaceful" Collection Pack
  • 2 - Snippets Chipboard Mini Pennants
  • 2 - Snippets Chipboard Pennants Mini 2 Point
  • 1 - Paper Accents Chipboard Micro RectScallop Pennants
  • Making Memories White Pearl Brads
  • 1 - Silver Tinsel Stems
  • 1 - Studio Calico Wood Veneer Stars
  • 1 - Sierra Pacific Crafts Unfinished Wood Stars
  • Clear Embossing Ink, Clear andf Glitter Embossing Power, Clear Snow-like Glitter
  • Star Dust Stickles
  • Silver and Red Paint
  • Bottle Caps
  • Small Clothes Pins
  • Small Circle Punch
  • Ranger's Sage Distress Ink
  • Heat Gun
  • Queen and Co Rhinestones and Twinkle Goosebumps
  • Pioneer Embellishment Glue Stick, Modge Podge, E6000 Glue, Glossy Accents, Glue Gun
  • White Sheer and  Cream Ribbon

Directions

Authentique "Peaceful" Burlap Christmas Garland/Banner

How to transform the pockets into stockings:
  1. Shape the burlap pocket into a stocking by folding and tucking the left corner in.
  2. With a towel underneath the burlap to protect your ironing board, spray starch and iron the burlap in order to hold its shape and prevent fraying.
  3. I preferred my stockings sewen closed.  I used my sewing machine and some red thread to add some color to the top.

 
These burlap pockets are 2.5" x 3.5".  Small enough to hold mini candy canes, peppermint sticks, or toffee.  Gift cards or tags could fit nicely too.  The garland has 24 pockets perfect for an advent calendar or 12 days of Christmas banner. 
 
 
I chose to pull off a few pockets from the garland to later make Christmas ornaments.  For this project, I added a few banner pennants. I plan on tucking this garland in my Christmas Tree or hanging it from a fireplace mantel.


How to give your paper project an icy look:
 
1.  After using a Pioneer Embellishment Glue Stick to adhere patterned paper to the chipboard pennant, use a blending tool and apply clear embossing ink.  Sprinkle on the clear and glitter embossing powder and use a heat gun to set.
2.  Use a sponge applicator and brush on some  Modge Podge the edges of your pennant. Sprinkle some Snow Glitter.  The Modge Podge dries clear and holds the glitter well!
3. For the bottle caps, after adhering a small circle of patterned paper to the inside bottom of the cap, use a thin layer of Glossy Accents to coat the paper.  Then, sprinkle a pinch of glitter to give the appearance of an icy window.


How to make your own tinssel star:
 
1.  Wrap a Silver Tinsel Stems/Pipe Cleaner around a pencil.  Shape the spiral into a star.  Glue the brad into the center.


These stars were painted using mettalic silver and red paint.  A quick and fast little embellishment!


You can follow Rebecca and her chic style on her blog, Facebook, and Pinterest